

Getting an out-of-network claim paid often takes more than submitting a clean claim.
Providers must verify benefits, confirm authorization, document services correctly, submit accurate codes, and challenge incorrect denials or underpayments.
This guide explains practical steps providers can use to improve out-of-network reimbursement while following payer rules and applicable billing laws.
What Does Out of Network Mean?
An out-of-network provider does not have a participating contract with the patient’s health plan for the service or location involved.
The patient’s plan may still provide out-of-network benefits.
For example, a PPO may allow patients to visit nonparticipating physicians while requiring higher deductibles and coinsurance. A narrow network plan may provide little or no out-of-network coverage except for emergencies or specific circumstances.
Therefore, never assume that:
Out of network equals no coverage.
Instead, determine exactly what the patient’s plan covers.
The practice should verify:
- Whether the provider participates with the plan
- Whether the specific location participates
- Whether the patient’s plan includes out-of-network benefits
- The out-of-network deductible
- The out-of-network coinsurance
- The out of network maximum
- Whether the plan pays the provider or patient
- Whether authorization applies
- Whether a referral applies
- Whether the service has a benefit limitation
- The payer’s timely filing limit
- The payer’s claim submission requirements
This information gives the billing team a realistic picture of what it can collect.
Can Out of Network Providers Get Insurance Claims Paid?
Yes, in many situations.
Payment depends on the patient’s insurance plan, the service, provider status, applicable federal and state requirements, and whether the claim meets the payer’s conditions for payment.
A plan may pay an out-of-network claim at a lower benefit level than an in-network claim. Some plans may not cover the service at all.
For example, a patient’s policy might provide:
| Benefit | In Network | Out of Network |
| Deductible | $1,000 | $2,500 |
| Coinsurance | 20% | 40% |
| Annual maximum | $5,000 | $10,000 |
| Provider network | Participating | Nonparticipating |
The figures above provide an example only. Actual benefits vary by plan.
The practice should verify the patient’s specific benefits rather than estimate reimbursement from general insurance rules.
How to Get Out of Network Claims Paid
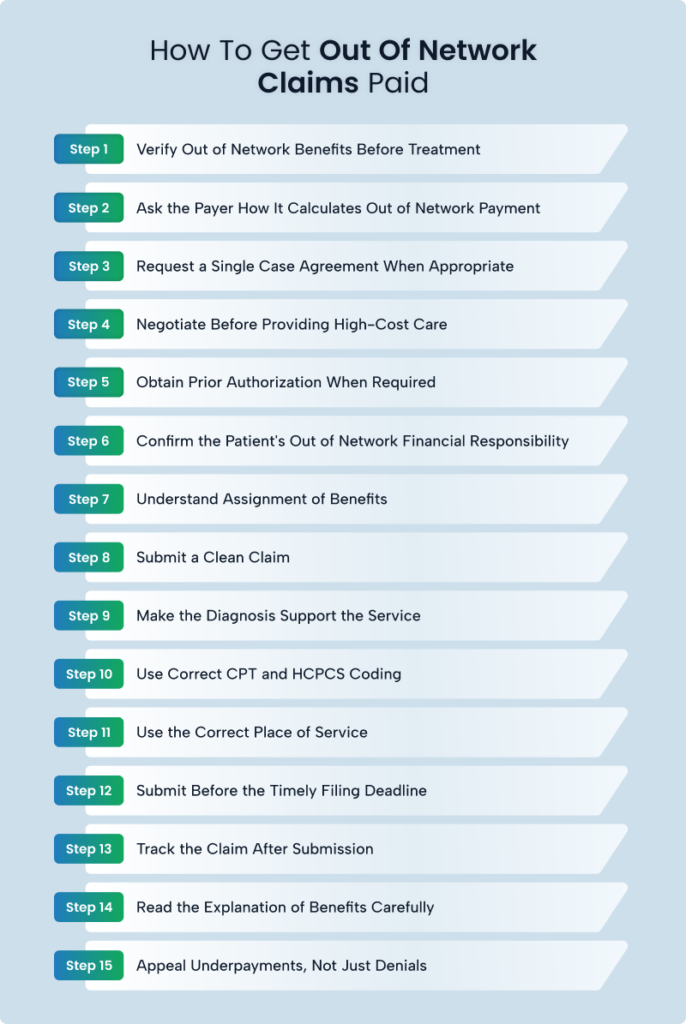
Step 1: Verify Out of Network Benefits Before Treatment
The best time to prevent an out of network payment problem is before the patient receives care.
Ask the payer specifically:
Does this member’s plan include out of network benefits for this service?
Do not stop after receiving a simple “active coverage” response.
Active coverage only tells you that the policy exists. It does not tell you whether the patient’s plan will pay for the service.
Verify These Details
Your verification team should collect:
- Member name
- Member identification number
- Group number
- Plan name
- Provider network status
- Out of network benefit
- Deductible
- Remaining deductible
- Coinsurance
- Copayment
- Out of pocket maximum
- Service limitations
- Authorization requirements
- Referral requirements
- Claim filing address
- Electronic payer identification
- Timely filing limit
- Assignment of benefits rules
- Whether the payer sends payment to the provider or patient
Document the verification reference number, date, time, and representative name when available.
Step 2: Ask the Payer How It Calculates Out of Network Payment
This question can make a major difference:
“What amount does the plan use to calculate out-of-network reimbursement for this service?”
A payer may base payment on:
- Its allowed amount
- A percentage of the Medicare rate
- A plan-specific fee schedule
- A usual and customary methodology
- A reference-based pricing methodology
- A negotiated amount
- A state-mandated payment method
- A federal No Surprises Act methodology in applicable circumstances
Never assume that the provider’s billed charge determines the payer’s reimbursement.
For example, a provider may charge $300 for a service while the plan calculates its out-of-network benefit from an allowed amount of $150.
The patient may then owe a portion of the applicable cost sharing, subject to the plan and applicable law.
Step 3: Request a Single Case Agreement When Appropriate
A single case agreement, often called an SCA, allows a provider and health plan to establish terms for a particular patient or episode of care.
It can make sense when:
- The patient needs specialized care
- The plan has no suitable in network provider
- The provider offers a service that network providers cannot provide
- The patient needs continuity of care
- The provider has a strong clinical reason to remain involved
- The payer agrees to negotiate a payment rate
An SCA can sometimes produce a better reimbursement arrangement than ordinary out of network processing.
Get the Agreement in Writing
Do not rely on a verbal promise.
The agreement should identify:
- Patient
- Provider
- Payer
- Effective dates
- Covered services
- Payment rate
- Patient responsibility
- Authorization requirements
- Claim submission instructions
- Required modifiers
- Required place of service
- Any exclusions
Keep the agreement with the patient’s billing record.
A verbal agreement that never reaches the payer’s claims department can create a major payment problem.
Step 4: Negotiate Before Providing High-Cost Care
For expensive procedures, negotiate before treatment whenever possible.
This works particularly well for:
- Surgery
- Infusion therapy
- Oncology treatment
- Complex diagnostic services
- Rehabilitation programs
- Specialty procedures
- High-cost durable medical equipment
- Hospital based services
- Complex behavioral health treatment
Ask the payer for a written case rate or negotiated reimbursement arrangement.
The negotiation should address the expected payment rather than simply asking whether the service has coverage.
A useful question is:
“What reimbursement amount will the plan apply to this specific service if we provide it to this member?”
Then obtain written confirmation.
Step 5: Obtain Prior Authorization When Required
Out of network status does not remove authorization requirements.
A payer may require authorization for certain services regardless of whether the provider participates in the network.
Check authorization requirements before treatment.
Document:
- Authorization number
- Approved service
- Approved units
- Approved dates
- Provider
- Facility
- Diagnosis
- Procedure
- Payer representative
- Reference number
Authorization does not always guarantee payment.
The claim still needs to satisfy the plan’s other requirements.
That distinction matters.
Authorization means the payer approved the requested service under its authorization process. It does not necessarily guarantee the final payment amount.
Step 6: Confirm the Patient’s Out of Network Financial Responsibility
Providers should explain expected financial responsibility before care whenever applicable.
Tell the patient:
- The provider is out of network
- The plan’s out of network benefits
- The expected deductible
- The expected coinsurance
- The provider’s charge
- Whether the payer may send reimbursement to the patient
- Whether the patient may owe an amount beyond the payer payment
- Any applicable billing protections
Do not promise the patient that insurance will pay a specific amount unless the payer has provided a reliable benefit or payment determination.
Step 7: Understand Assignment of Benefits
Assignment of benefits allows the patient to direct insurance payment toward the provider.
However, assignment rules vary by payer and plan.
Some payers may send out of network reimbursement directly to the patient unless the patient assigns benefits to the provider.
That creates an obvious collection problem.
The provider performs the service, submits the claim, and the payer sends payment to the patient.
The practice then has to collect the applicable amount from the patient.
Use the payer’s required assignment process and retain the patient’s authorization when applicable.
Step 8: Submit a Clean Claim
A strong negotiation cannot compensate for a poorly submitted claim.
The claim should accurately report:
- Patient information
- Subscriber information
- Payer
- Provider NPI
- Tax identification information
- Billing provider
- Rendering provider
- Service location
- Date of service
- CPT or HCPCS codes
- ICD 10 CM diagnosis codes
- Modifiers
- Units
- Charges
- Authorization information
- Referring provider when required
- Other required claim data
Professional services generally use the CMS 1500 claim form or its electronic equivalent, 837P.
Institutional services generally use the CMS 1450, also called the UB 04, or the electronic 837I format.
The correct format depends on the provider type and service.
Step 9: Make the Diagnosis Support the Service
An out of network claim still needs to demonstrate medical necessity.
The diagnosis should accurately represent the condition documented by the provider.
Do not select a diagnosis because it produces better reimbursement.
Instead:
Clinical documentation → diagnosis → procedure → claim
This sequence protects the provider during payer review.
Step 10: Use Correct CPT and HCPCS Coding
Correct coding remains one of the strongest tools for reimbursement.
Before submission, verify:
- Code selection
- Code status
- Modifier requirements
- Units
- Global surgery rules when applicable
- Bundling rules
- National Correct Coding Initiative edits
- Payer specific billing rules
Do not automatically report every service separately.
Some services may bundle under CPT or payer rules.
Step 11: Use the Correct Place of Service
Place of service can significantly affect claim processing and payment.
The same procedure may receive different reimbursement depending on where the provider performed it.
Common settings include:
- Office
- Outpatient hospital
- Inpatient hospital
- Ambulatory surgical center
- Independent laboratory
- Home
- Telehealth-related settings
Review the actual location where the service occurred.
Do not choose a place of service based only on the provider’s specialty.
Step 12: Submit Before the Timely Filing Deadline
Every payer has its own claim submission rules.
Commercial plans can impose different timely filing limits depending on the policy and provider agreement.
Medicare has a specific federal timely filing rule. Medicare Part B claims generally must reach the Medicare contractor no later than 12 months after the date of service, subject to limited exceptions.
Track filing deadlines in your billing system.
Do not wait until the end of the filing period.
A rejected claim does not necessarily count as a successfully adjudicated claim.
Your team should monitor rejected claims immediately and correct them before the filing deadline expires.
Step 13: Track the Claim After Submission
Submitting the claim is not the final step.
Track:
Claim received → accepted → adjudicated → paid or denied
Monitor:
- Clearinghouse acceptance
- Payer acceptance
- Claim status
- Payment
- Explanation of benefits
- Denial reason
- Patient responsibility
- Appeal deadline
A claim that remains unpaid for several weeks needs attention.
Do not allow aging claims to disappear into accounts receivable.
Step 14: Read the Explanation of Benefits Carefully
The EOB or electronic remittance advice explains how the payer processed the claim.
Review:
- Billed amount
- Allowed amount
- Paid amount
- Deductible
- Coinsurance
- Copayment
- Noncovered amount
- Adjustment
- Denial reason
- Remark codes
- Patient responsibility
The most important question is:
Did the payer process the claim according to the patient’s actual benefits and the applicable payment rules?
If the answer appears to be no, investigate.
Step 15: Appeal Underpayments, Not Just Denials
Many practices appeal completely denied claims but ignore underpayments.
That leaves money on the table.
Suppose:
- Provider charge: $500
- Expected allowed amount: $350
- Payer payment: $140
- Patient responsibility: $100
- Expected total reimbursement: $350
The claim may appear paid because the payer issued $140.
But if the payer should have allowed $350, the practice has a reimbursement discrepancy.
Analyze the EOB before posting the claim as fully resolved.
Build an Underpayment Review Process
Compare:
Expected reimbursement vs actual reimbursement
Review high value services first.
Track underpayments by:
- Payer
- Plan
- CPT code
- Provider
- Location
- Service type
- Date of service
Patterns often reveal payer processing problems.
How to Appeal an Out of Network Claim
A strong appeal does not simply say:
“We disagree with the denial.”
Instead, explain exactly why the payer should reconsider the claim.
Include
- Patient information
- Claim number
- Date of service
- Provider information
- CPT or HCPCS code
- Diagnosis
- Authorization number
- EOB
- Medical records when relevant
- Referral documentation
- Single case agreement
- Benefit verification
- Prior payer correspondence
- Contract or plan language when relevant
- Clear explanation of the requested correction
Then state the requested resolution.
For example:
“Please reprocess the claim using the out of network benefit applicable to this member and the documented authorization for the service.”
Specific requests give the payer a clear action to take.
Medicare Requires a Different Approach
Providers should not treat Medicare like a commercial out-of-network plan.
Medicare distinguishes between participating and nonparticipating physicians and suppliers.
A Medicare participating provider agrees to accept assignment on all Medicare covered services. A nonparticipating provider can accept assignment on individual claims.
CMS states that nonparticipating providers generally receive 5 percent less than the Medicare Physician Fee Schedule amount when Medicare prices the service under the Physician Fee Schedule, and the limiting charge restricts what the provider may charge the Medicare patient for applicable unassigned services.
Therefore, providers should check Medicare participation status and applicable limiting charge rules before billing Medicare patients.
CMS also provides the Physician Fee Schedule Look Up Tool, which shows payment information and related payment policies for many services.
Medicare Advantage
Medicare Advantage operates through private Medicare health plans.
A provider should verify the patient’s specific Medicare Advantage plan before treating the patient.
Do not assume that an Original Medicare rule automatically applies to a Medicare Advantage claim.
Check:
- Network status
- Referral requirements
- Authorization
- Plan benefits
- Claim submission instructions
- Appeal procedures
CMS provides specific appeal procedures for Medicare Advantage plans. For certain organization determination appeals, the physician, enrollee, or representative can request reconsideration within the applicable timeframe.
The No Surprises Act Changes Some Out of Network Billing Situations
Providers must understand the federal No Surprises Act before collecting out of network balances.
The law protects many patients from surprise bills for:
- Emergency services
- Certain non emergency services provided by out of network providers at in network facilities
- Certain air ambulance services
CMS explains that patients generally receive in network cost sharing protections for covered services in these protected situations.
This means a provider cannot simply see an out of network patient and assume that the practice can bill the patient for the entire difference between its charge and the health plan’s payment.
The specific facts matter.
Measure These Out of Network Billing Metrics
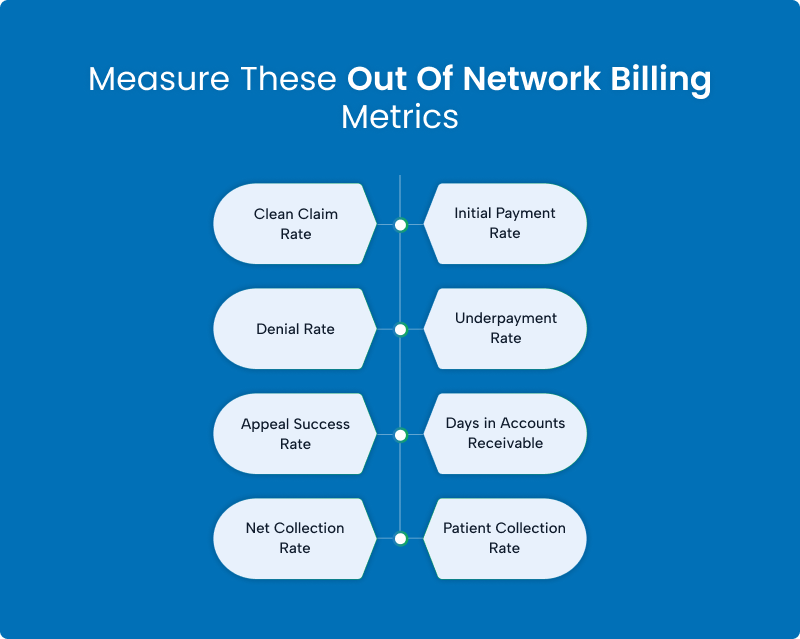
A provider should monitor more than total collections.
Track:
Clean Claim Rate
Percentage of claims accepted without correction.
Initial Payment Rate
Percentage of claims paid without an appeal.
Denial Rate
Percentage of submitted claims that receive a denial.
Underpayment Rate
Percentage of claims where actual reimbursement falls below the expected amount.
Appeal Success Rate
Percentage of appealed claims that result in additional payment.
Days in Accounts Receivable
Average time required to collect payment.
Net Collection Rate
Amount collected compared with the amount the practice expects to collect after contractual and other adjustments.
Patient Collection Rate
Amount actually collected from patients compared with the amount assigned to patient responsibility.
These metrics reveal where the reimbursement process loses money.
Out of Network Claim Checklist
Before submitting:
☐ Verify active coverage
☐ Confirm out of network benefits
☐ Check deductible and coinsurance
☐ Confirm provider network status
☐ Verify authorization requirements
☐ Obtain an SCA when appropriate
☐ Confirm claim submission requirements
☐ Verify patient demographics
☐ Verify subscriber information
☐ Confirm provider NPI and tax information
☐ Verify CPT and HCPCS codes
☐ Verify ICD 10 CM diagnoses
☐ Check modifiers
☐ Check units
☐ Confirm place of service
☐ Review timely filing limit
☐ Submit the claim
After submission:
☐ Confirm payer acceptance
☐ Track claim status
☐ Review EOB or remittance advice
☐ Compare payment with expected reimbursement
☐ Identify underpayments
☐ Identify denial reason
☐ File an appeal when justified
☐ Track appeal outcome
☐ Post payment correctly
☐ Follow applicable patient billing rules
Frequently Asked Questions
How can I get an insurance company to pay more for an out of network claim?
Start by determining how the plan calculates out of network reimbursement. If the payer underpaid the claim, compare the payment with the applicable benefit and payment methodology.
For eligible cases, providers can also negotiate a single case agreement, request reconsideration, file an appeal, or use an applicable payment dispute process.
Does out of network mean the insurance company will not pay?
No.
Some plans provide substantial out of network benefits. Others provide limited or no routine out of network coverage.
Always verify the specific member’s plan.
Can I negotiate an out of network rate with an insurance company?
Yes, providers and health plans can negotiate payment arrangements in appropriate circumstances. A single case agreement can establish specific payment terms for an individual patient or episode of care.
Get the agreement in writing before relying on it for billing.
What should I do if an insurance company underpays an out of network claim?
Compare the payment with the applicable benefit and expected allowed amount.
If the payer processed the claim incorrectly, request reconsideration or appeal according to the plan’s procedures.
Include the EOB, claim information, benefit verification, authorization, agreement, and other supporting documentation.
Can I balance bill an out of network patient?
Not always.
Federal and state laws can restrict balance billing in certain situations. The No Surprises Act protects patients from certain unexpected out of network bills, including specified emergency and facility-based situations.
Review the specific circumstances and applicable law before billing the patient.
Improve Your Out of Network Reimbursement With Medivantek
Out of network billing can become difficult when payers apply different benefit rules, authorization requirements, payment methods, and appeal processes.
Medivantek helps healthcare providers manage eligibility verification, claims submission, payment posting, denial follow up, and reimbursement review.
Our team can help identify unpaid claims, investigate underpayments, strengthen claim submission, and pursue appropriate payer follow up so your practice can collect the reimbursement it has earned.
Want to find where your practice is losing out of network revenue?
Contact Medivantek for a billing and reimbursement review today.
